跳转至内容

[原创][Mod]基于opengl取色的hsv色盘屏幕

妙妙工具
5 4 113 2
  • 直接上代码。

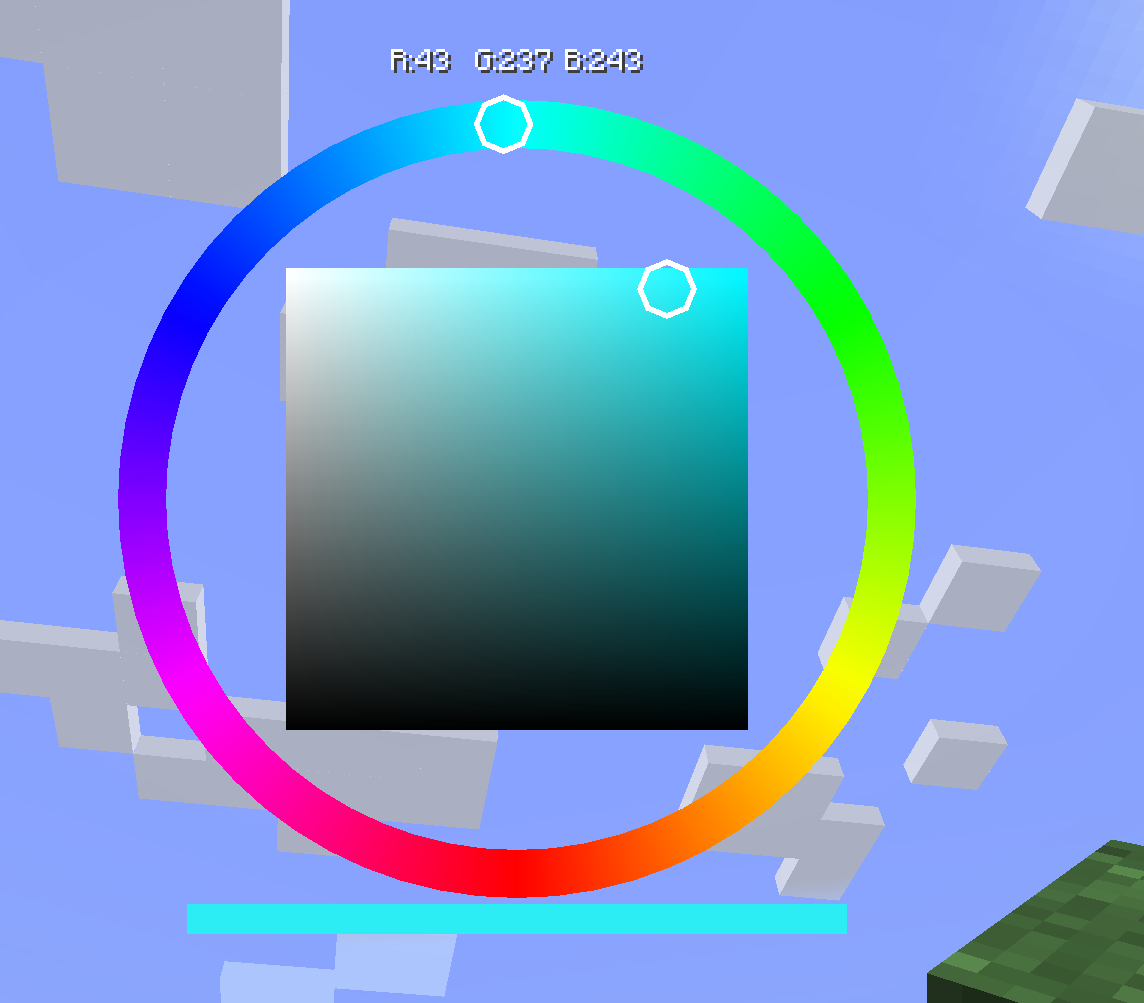
    import com.mojang.blaze3d.systems.RenderSystem;
    import com.mojang.blaze3d.vertex.*;
    import net.minecraft.client.Minecraft;
    import net.minecraft.client.gui.GuiGraphics;
    import net.minecraft.client.gui.screens.Screen;
    import net.minecraft.client.renderer.GameRenderer;
    import net.minecraft.network.chat.Component;
    import net.minecraft.util.FastColor;
    import org.joml.Matrix4f;
    import org.lwjgl.BufferUtils;
    import org.lwjgl.opengl.GL11;
    
    import java.awt.*;
    import java.nio.ByteBuffer;
    
    public class ColorPickerScreen extends Screen {
        private int pickColor = 0xFFFFFFFF;
        private int hueColor = Color.HSBtoRGB(0f, 1f, 1f);
        private double pendingMouseX = -1, pendingMouseY = -1;
    
        // 色板与色相条的位置/尺寸常量
        private static final int PANEL_X = 0, PANEL_Y = 0, PANEL_W = 200, PANEL_H = 100;
        private static final int HUE_X = 10, HUE_H = 20, HUE_W = 200, HUE_Y_OFFSET = 30;
        private static final int PREVIEW_X = 300, PREVIEW_Y = 0, PREVIEW_W = 50, PREVIEW_H = 50;
        private static final int HUE_SEGMENTS = 100;
    
        public ColorPickerScreen() {
            super(Component.literal("HSV Color Picker"));
        }
    
        @Override
        public void render(GuiGraphics guiGraphics, int mouseX, int mouseY, float partialTicks) {
            super.render(guiGraphics, mouseX, mouseY, partialTicks);
    
            Matrix4f mat = guiGraphics.pose().last().pose();
            Tesselator tess = Tesselator.getInstance();
            BufferBuilder buf = tess.getBuilder();
    
            RenderSystem.setShader(GameRenderer::getPositionColorShader);
            buf.begin(VertexFormat.Mode.QUADS, DefaultVertexFormat.POSITION_COLOR);
            drawColorPanel(mat, buf);
            drawHueBar(mat, buf);
            drawPreview(mat, buf);
            tess.end();
    
            // 在所有内容绘制完后再执行拾色
            handlePendingPick(guiGraphics);
        }
    
        @Override
        public boolean mouseClicked(double mouseX, double mouseY, int button) {
            this.pendingMouseX = mouseX;
            this.pendingMouseY = mouseY;
            return super.mouseClicked(mouseX, mouseY, button);
        }
    
        // === 私有封装方法 ===
    
        /** 绘制从黑→黑→选中色→白的渐变色板 */
        private void drawColorPanel(Matrix4f mat, BufferBuilder buf) {
            buf.vertex(mat, PANEL_X, PANEL_Y + PANEL_H, 0).color(0f, 0f, 0f, 1f).endVertex();
            buf.vertex(mat, PANEL_X + PANEL_W, PANEL_Y + PANEL_H, 0).color(0f, 0f, 0f, 1f).endVertex();
    
            float rHue = FastColor.ARGB32.red(hueColor)   / 255f;
            float gHue = FastColor.ARGB32.green(hueColor) / 255f;
            float bHue = FastColor.ARGB32.blue(hueColor)  / 255f;
            buf.vertex(mat, PANEL_X + PANEL_W, PANEL_Y, 0).color(rHue, gHue, bHue, 1f).endVertex();
    
            buf.vertex(mat, PANEL_X, PANEL_Y, 0).color(1f, 1f, 1f, 1f).endVertex();
        }
    
        /** 绘制水平色相条 */
        private void drawHueBar(Matrix4f mat, BufferBuilder buf) {
            int hueY = this.height - HUE_Y_OFFSET;
            for (int i = 0; i < HUE_SEGMENTS; i++) {
                float h1 = (float) i / HUE_SEGMENTS;
                float h2 = (float)(i + 1) / HUE_SEGMENTS;
                int c1 = Color.HSBtoRGB(h1, 1f, 1f);
                int c2 = Color.HSBtoRGB(h2, 1f, 1f);
                float r1 = ((c1>>16)&0xFF)/255f, g1 = ((c1>>8)&0xFF)/255f, b1 = (c1&0xFF)/255f;
                float r2 = ((c2>>16)&0xFF)/255f, g2 = ((c2>>8)&0xFF)/255f, b2 = (c2&0xFF)/255f;
    
                int x1 = HUE_X + i * HUE_W / HUE_SEGMENTS;
                int x2 = HUE_X + (i+1) * HUE_W / HUE_SEGMENTS;
                buf.vertex(mat, x1, hueY, 0).color(r1, g1, b1, 1f).endVertex();
                buf.vertex(mat, x2, hueY, 0).color(r2, g2, b2, 1f).endVertex();
                buf.vertex(mat, x2, hueY + HUE_H, 0).color(r2, g2, b2, 1f).endVertex();
                buf.vertex(mat, x1, hueY + HUE_H, 0).color(r1, g1, b1, 1f).endVertex();
            }
        }
    
        /** 在右侧绘制当前 pickColor 预览小矩形 */
        private void drawPreview(Matrix4f mat, BufferBuilder buf) {
            float r = FastColor.ARGB32.red(pickColor)   / 255f;
            float g = FastColor.ARGB32.green(pickColor) / 255f;
            float b = FastColor.ARGB32.blue(pickColor)  / 255f;
    
            buf.vertex(mat, PREVIEW_X,               PREVIEW_Y + PREVIEW_H, 0).color(r, g, b, 1f).endVertex();
            buf.vertex(mat, PREVIEW_X + PREVIEW_W,   PREVIEW_Y + PREVIEW_H, 0).color(r, g, b, 1f).endVertex();
            buf.vertex(mat, PREVIEW_X + PREVIEW_W,   PREVIEW_Y,             0).color(r, g, b, 1f).endVertex();
            buf.vertex(mat, PREVIEW_X,               PREVIEW_Y,             0).color(r, g, b, 1f).endVertex();
        }
    
        /** 处理 pendingMouseX/Y,进行边界检查并调用 glReadPixels 拾色 */
        private void handlePendingPick(GuiGraphics guiGraphics) {
            if (pendingMouseX < 0) return;
    
            // 边界判断:面板 或 色相条
            boolean inPanel = pendingMouseX >= PANEL_X && pendingMouseX <= PANEL_X + PANEL_W
                    && pendingMouseY >= PANEL_Y && pendingMouseY <= PANEL_Y + PANEL_H;
            int hueY = this.height - HUE_Y_OFFSET;
            boolean inHue  = pendingMouseX >= HUE_X && pendingMouseX <= HUE_X + HUE_W
                    && pendingMouseY >= hueY   && pendingMouseY <= hueY + HUE_H;
            if (!inPanel && !inHue) {
                pendingMouseX = pendingMouseY = -1;
                return;
            }
    
            // 计算 OpenGL 像素坐标
            double scale = Minecraft.getInstance().getWindow().getGuiScale();
            if (scale < 1) scale = 1;
            int px = (int)(pendingMouseX * scale);
            int py = (int)(pendingMouseY * scale);
            int glY = Minecraft.getInstance().getWindow().getHeight() - py - 1;
            guiGraphics.flush();
    
            ByteBuffer buf = BufferUtils.createByteBuffer(3);
            GL11.glReadPixels(px, glY, 1, 1, GL11.GL_RGB, GL11.GL_UNSIGNED_BYTE, buf);
            int r = buf.get(0)&0xFF, g = buf.get(1)&0xFF, b = buf.get(2)&0xFF;
    
            if (inHue) {
                hueColor = FastColor.ARGB32.color(255, r, g, b);
            } else {
                pickColor = FastColor.ARGB32.color(255, r, g, b);
            }
    
            pendingMouseX = pendingMouseY = -1;
        }
    }
    

    具体的注释都在代码里面了,一些魔法数字我也写成了字段。
    项目地址在我的github仓库, 都是LGPLv3的代码

  • 附上图片效果
    71eea85f5718235a201c166d9faaa592.png

  • 是KL大蛇

  • 俺寻思能行.jpg
    image.png

  • 没有教程的话,哇达西?


相关推荐


  • [原创][Mod]通过特定格式文字进行查找结构

    妙妙工具 forge mixin
    1
    0 赞同
    1 帖子
    76 浏览
    昨天没做东西,今天也没K
    故事的起因是有帮twf写模组时,需要用到查找结构指令显示坐标给玩家,但是玩家不一定有权限或者ftbq发送并不会sendmessage给玩家,所以有了此代码。 我也将结构查找的功能写成了一个类,可以直接拿去用。 public class StructureLocator { private static final ResourceKey<Registry<ConfiguredStructureFeature<?, ?>>> STRUCTURE_REGISTRY_KEY = Registry.CONFIGURED_STRUCTURE_FEATURE_REGISTRY; /** * 根据单个结构 ResourceLocation(如 "minecraft:village" 或者自定义 mod:id)查找最近的那个点。 * * @param level 当前维度 * @param center 中心搜索点 * @param id 结构的 ResourceLocation * @param radius 搜索半径(方块数) * @param skipKnown 是否跳过已探索过的结构 * @return 如果找到,返回 Pair(结构坐标, Holder<该结构>); 找不到则 empty() */ public static Optional<Pair<BlockPos, Holder<ConfiguredStructureFeature<?, ?>>>> findNearest( ServerLevel level, BlockPos center, ResourceLocation id, int radius, boolean skipKnown ) { Registry<ConfiguredStructureFeature<?, ?>> registry = level.registryAccess().registryOrThrow(STRUCTURE_REGISTRY_KEY); ResourceKey<ConfiguredStructureFeature<?, ?>> key = ResourceKey.create(STRUCTURE_REGISTRY_KEY, id); Holder<ConfiguredStructureFeature<?, ?>> holder = registry.getHolder(key).orElse(null); if (holder == null) return Optional.empty(); HolderSet<ConfiguredStructureFeature<?, ?>> holderSet = HolderSet.direct(holder); Pair<BlockPos, Holder<ConfiguredStructureFeature<?, ?>>> result = level.getChunkSource() .getGenerator() .findNearestMapFeature(level, holderSet, center, radius, skipKnown); return Optional.ofNullable(result); } /** * 根据 TagKey(像 "#minecraft:village")来查找最近的结构。 * * @param level 当前维度 * @param center 中心搜索点 * @param tagKey 结构 TagKey(Registry.CONFIGURED_STRUCTURE_FEATURE_REGISTRY 下的 Tag) * @param radius 搜索半径 * @param skipKnown 是否跳过已探索结构 * @return 如果找到,返回 Pair(结构坐标, Holder<该结构>); 找不到则 empty() */ public static Optional<Pair<BlockPos, Holder<ConfiguredStructureFeature<?, ?>>>> findNearestByTag( ServerLevel level, BlockPos center, TagKey<ConfiguredStructureFeature<?, ?>> tagKey, int radius, boolean skipKnown ) { Registry<ConfiguredStructureFeature<?, ?>> registry = level.registryAccess().registryOrThrow(STRUCTURE_REGISTRY_KEY); HolderSet<ConfiguredStructureFeature<?, ?>> holderSet = registry.getOrCreateTag(tagKey); Pair<BlockPos, Holder<ConfiguredStructureFeature<?, ?>>> result = level.getChunkSource() .getGenerator() .findNearestMapFeature(level, holderSet, center, radius, skipKnown); return Optional.ofNullable(result); } /** * 把查到的结果格式化成一个聊天用的组件(绿色坐标 + 距离)。 * * @param structureName 你想显示的结构名称(如 "minecraft:village" 或 "#minecraft:village") * @param origin 搜索中心 * @param pair findNearest 返回的 Pair * @param translateKey 翻译 key,通常用 "commands.locate.success" */ public static Component formatLocateResult( String structureName, BlockPos origin, Pair<BlockPos, Holder<ConfiguredStructureFeature<?, ?>>> pair, String translateKey ) { BlockPos found = pair.getFirst(); int distance = Mth.floor( dist(origin.getX(), origin.getZ(), found.getX(), found.getZ()) ); MutableComponent coords = ComponentUtils.wrapInSquareBrackets( new TranslatableComponent("chat.coordinates", found.getX(), "~", found.getZ()) ); return new TranslatableComponent( translateKey, structureName, coords, distance ); } private static float dist(int x1, int z1, int x2, int z2) { int dx = x2 - x1, dz = z2 - z1; return Mth.sqrt((float) (dx * dx + dz * dz)); } } 这部分代码就是查找结构有关的类了,通过获取ConfiguredStructureFeature的注册表,然后再获取结构的Holder类,再给ChunkGenerator的findNearestMapFeature方法去获取到BlockPos。 @Mixin(ServerPlayer.class) public class ServerPlayerMixin { @ModifyArg(method = "sendMessage(Lnet/minecraft/network/chat/Component;Lnet/minecraft/network/chat/ChatType;Ljava/util/UUID;)V", at = @At(value = "INVOKE", target = "Lnet/minecraft/network/protocol/game/ClientboundChatPacket;<init>(Lnet/minecraft/network/chat/Component;Lnet/minecraft/network/chat/ChatType;Ljava/util/UUID;)V"), index = 0) public Component modifyMessage(Component component){ MutableComponent mutableComponent = component.copy(); String message = mutableComponent.getString(); ServerPlayer serverPlayer = (ServerPlayer) (Object) this; if (message.contains("<structure>") && message.contains("</structure>")) { String structure = message.replaceAll(".*<structure>(.*?)</structure>.*", "$1"); BlockPos center = serverPlayer.blockPosition(); Optional<Pair<BlockPos, Holder<ConfiguredStructureFeature<?, ?>>>> holderPair = StructureLocator.findNearest( serverPlayer.getLevel(), center, new ResourceLocation(structure), 100, false ); AtomicReference<String> replace = new AtomicReference<>(); holderPair.ifPresentOrElse(pair -> { Component component1 = StructureLocator.formatLocateResult(structure, center, pair, "commands.locate.success"); replace.set(component1.getString()); }, () -> { replace.set(new TranslatableComponent("commands.locate.failed", structure).getString()); }); Style style = component.getStyle(); mutableComponent = new TextComponent(message.replaceAll("<structure>(.*?)</structure>", "§a%s§r".formatted(replace.get()))).withStyle(style); } return mutableComponent; } } 这段mixin则是注入ServerPlayer的sendMessage方法,修改new ClientboundChatPacket(message, type, sender)的message参数,||因为我偷懒,所以没用MixinExtra||,用正则表达式进行匹配到对应的结构格式文字,然后修改原文字中的内容。 这差不多都就是本次代码的全部内容了。
  • [1.20.1]强制加载并渲染特定区块

    灵感大王 渲染 forge
    5
    1 赞同
    5 帖子
    190 浏览
    忆然
    @Mafuyu 区块强制加载有用(点头
  • 1 赞同
    14 帖子
    296 浏览
    sdjgeS
    补药偷走我的钱包